In the spirit of shark week, I, an accomplice to a fishing team that brought in two sharks at Bethany Beach, in Delaware (ok, I watched and shrieked), will take you through the steps of catching a shark, at least as it pertains to Bethany. This is the method of brave fishermen Travis Gold (that’s my not-so-baby brother), Ben Schneider, and Owen Smith. So far, they’ve caught two sharks that are over 6 ft, and several smaller sharks.
Don’t believe me? Check this out:
Before we begin, a disclaimer: I will not be held responsible for any loss of life or limb. And you might want to at least consult a true expert, not just an accomplice, before you try this at home.
Without further ado:
Step 1: Find a beach. The only one my experience pertains to is Bethany, but it’s likely that other beaches in Delaware and Maryland are similar in terms of shark catching.
Step 2: Know the law. Many species of sharks are endangered, and it’s important for the entire ecology of the ocean to have a balanced population of sharks. So, in Delaware, and elsewhere, there are all sorts of rules about catching sharks. You can read them here. Most importantly for the purpose of this post, know that you have to release all toothed sharks—meaning that if you ask me what shark tastes like, I can’t tell you. All of the sharks my brother has caught so far have had teeth, and happily made it back to the ocean.
Step 3: Get a fishing license. In Delaware, for a non-resident, this only costs $20 a year, and $12.50 for a week. And it will save you trouble if any law enforcement comes around. Check out Delaware’s site, or you could ask at a local tackle store, like Hook’em and Cook’em, where Ben works.
Step 4: Get your timing right. It’s best to go out when the tide is changing, and sharks are most active. When I went, the fishermen started setting up around 6pm, but we didn’t get any action until around 9pm. Obviously, you don’t want to go when the beach is swarming with small children.
Step 5: Gather your gear. You’ll need a kayak or some sort of ocean-hardy vessel, a flashlight or headlamp, some bait fish (in a cooler, with ice, for your nose’s sake), some super heavy duty fishing rods, rod rests, super heavy duty fishing line, heavy duty hooks, some glow sticks, duct tape or rope, a thick glove (or two), pliers, or something to cut the fishing line, some beach chairs, bug spray, and some refreshments. Some of this gear may seem a little random, but it comes into play. Good gear is important. My brother once fished alongside a guy who battled a shark for over two hours—only for the line to snap, leaving him empty handed. So make sure you check with the guys at the tackle shop when you buy your stuff, and they can steer you right. And oh yeah, if you’re super cool, you’ll catch your own bait fish, which tend to be far more effective—mmm fresh fish blood.
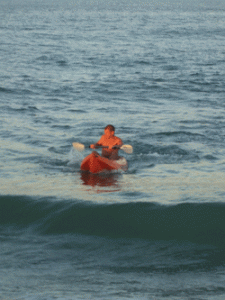
Step 6: Set up. Get your rod rests in the sand, and your lines ready. These will stay on the beach. If you have several lines going at a time, make sure they are spread out, and pointing in different directions. As the current works on them, you may have to do some shifting. Things can get really messy if they start to tangle. Kayak out with your bait fish, and set up your line. 200 yards or so from the shore should do the trick. Now that there’s rotting, dead fish in the water, screaming “eat me, shark,” kayak back as fast as you can, and try not to flip over, like Ben did once at 11pm. The shark could mistake you for that yummy, bloody, bait fish. (Don’t worry, Ben still has all his limbs). Depending on when you set up, you may or may not want to go ahead and attach glow sticks to the end of your fishing rods with duct tape or a good knot, whatever isn’t going to get in the way of your line. This lets you see if there’s weight on your line when it gets dark.
Step 7: Wait. You might not catch anything, and then again, you might. So this is the part where you enjoy the beautiful sunset on the beach, maybe have a beer, and chill on a blanket. Oh yeah, might want to reapply some of that bug spray.
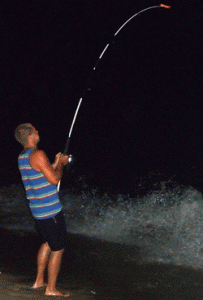
Step 8: Reel it in. You’re so excited, you just saw the glow stick on the end of your line go bobbing, and you run up to grab it. But now you’ve got a shark to fight. Take a strong stance, and have a couple of buddies ready to back you up. The base of the pole should be against your body—at about crotch level—and you should lean back against the shark when it’s pulling you. If you dip the rod down and pull back while you reel it in, this creates a little bit of slack for you to work with.
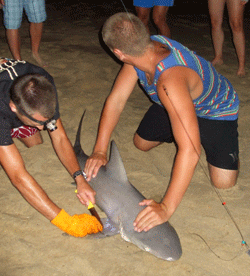
Step 9: Grab it. This is where the glove comes in. Beyond the whole sharp teeth thing, shark skin is rough, and can hurt your hands. But it’s going to come in fighting, and you’ve got to stop it from flailing around so that you can release it.
Step 10: Admire it. You’ve done it. Caught one. Take pictures, but don’t dillydally, because there’s a couple more steps.
Step 11: Release it. If the shark has teeth, it has to be released. Try to get the hook out as best you can—this may require one person to hold open the mouth while another gets in there with the pliers—or cut as much of the line as you can. Sharks are tough, and there’s a lot they can survive, but you’ve got to make sure they’ve got the best chances possible.
Step 12: Clean up. When you head home, don’t leave anything behind. No one wants to be on a littered beach (ok, mom talk over.)


Leave a Reply